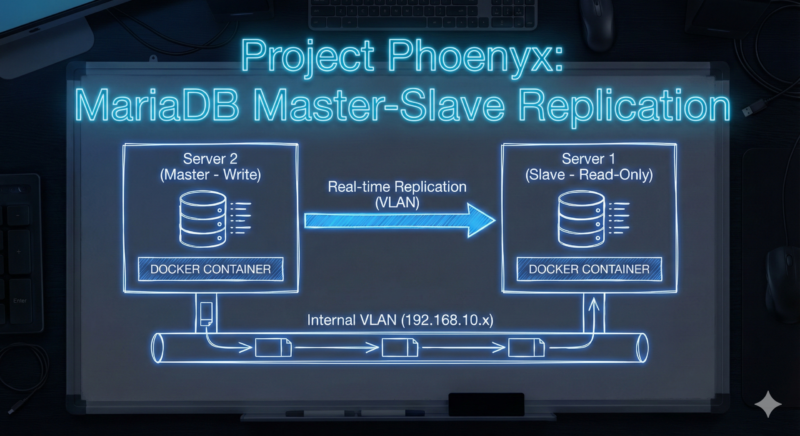
Architecture & Objectives
The goal is to establish a fail-safe database infrastructure between two servers via an internal VLAN to ensure data security for Vaultwarden, WordPress, and other services.
Master (Server 2)
IP: 192.168.10.30 (VLAN)
Version: MariaDB 11.3
Role: Active Write
Slave (Server 1)
IP: 192.168.10.10 (VLAN)
Version: MariaDB 11.3
Role: Read-Only Replica
Network: Communication occurs exclusively via the internal VLAN (192.168.10.0/24), not via the public internet.
Prerequisites & Preparation (Host-Level)
IP Forwarding on Slave (Server 1)
For Docker containers on Server 1 to communicate with the external VLAN, IP forwarding must be enabled in the kernel.
Error if ignored: Error 101: Network is unreachable.
# Enable temporarily (for testing)
sysctl -w net.ipv4.ip_forward=1

# Save permanently in /etc/sysctl.conf
echo "net.ipv4.ip_forward=1" >> /etc/sysctl.conf
Firewall Prioritization on Master (Server 2)
Since Server 2 runs Mailcow, its strict firewall rules often block port 3306 before custom rules take effect. The allow rule must be inserted at the top of the INPUT chain.
Error if ignored: Error 115: Operation in progress (Timeout).
# Insert rule at position 1 of INPUT chain
iptables -I INPUT 1 -s 192.168.10.10 -p tcp --dport 3306 -j ACCEPT
iptables-save or netfilter-persistent), otherwise they are lost after a reboot.
Setup Master (Server 2)
Docker Configuration
The Docker network must not be set to Internal: true, otherwise no port bindings are passed to the host. The port must be explicitly bound.
File: docker-compose.yml
services:
  mariadb-global:
    image: mariadb:11.3
    ports:
      # Binds to 0.0.0.0 (Security handled by VLAN firewall)
      # IMPORTANT: Do not bind to specific IP if Docker Proxy causes issues.
      - "3306:3306"
    volumes:
      - ./config:/etc/mysql/conf.d:ro
    # ... remaining config ...
File: ./config/replication.cnf
[mysqld]
server-id        = 1
log_bin          = /var/log/mysql/mysql-bin.log
expire_logs_days = 7
bind-address     = 0.0.0.0
sync_binlog      = 1
innodb_flush_log_at_trx_commit = 1
Create Replication User
Login to DB:
docker exec -it mariadb-global mariadb -u root -p
SQL Commands:
CREATE USER 'repl_user'@'192.168.10.10' IDENTIFIED BY 'YourSecurePassword';
GRANT REPLICATION SLAVE ON *.* TO 'repl_user'@'192.168.10.10';
FLUSH PRIVILEGES;
Setup Slave (Server 1)
Docker Configuration
Here too: The Docker network must be a standard Bridge Network (not an Internal Network) so the container is allowed to phone out.
File: docker-compose.yml
services:
  mariadb-replica:
    image: mariadb:11.3
    environment:
      - MYSQL_ROOT_PASSWORD=${MYSQL_ROOT_PASSWORD}
    volumes:
      - ./data:/var/lib/mysql
      - ./config:/etc/mysql/conf.d:ro
    ports:
      - "127.0.0.1:3306:3306" # Only locally accessible
File: ./config/replica.cnf
[mysqld]
server-id = 2
read_only = 1  # Write protection (prevents data chaos)
log_bin   = /var/log/mysql/mysql-bin.log
relay_log = /var/log/mysql/mysql-relay-bin.log
Initialization & Synchronization
To start replication, the slave must know the exact starting point (Log File & Position) of the master.
Create Dump & Note Position (On Master)
To guarantee data consistency, tables are briefly locked.
Login: docker exec -it mariadb-global mariadb -u root -p
SQL Commands for Lock and Status:
FLUSH TABLES WITH READ LOCK;
SHOW MASTER STATUS;
-> NOTE: File (e.g., mysql-bin.000001) and Position (e.g., 16670)
Open second terminal for dump (while Terminal 1 stays open!)
Note: mariadb:11.3 uses mariadb-dump instead of mysqldump
docker exec mariadb-global mariadb-dump -u root -p --all-databases > /tmp/master.sql
Terminal 1: Unlock tables
UNLOCK TABLES;
Import Dump & Start (On Slave)
Copy master.sql to Server 1 and import it at startup (or via mariadb < master.sql).
Login to Slave DB: docker exec -it mariadb_replica mariadb -u root -p
STOP SLAVE;
CHANGE MASTER TO
  MASTER_HOST='192.168.10.30',
  MASTER_USER='repl_user',
  MASTER_PASSWORD='YourSecurePassword',
  MASTER_PORT=3306,
  MASTER_LOG_FILE='mysql-bin.000001',  -- Value from previous step
  MASTER_LOG_POS=16670;                -- Value from previous step
START SLAVE;
Troubleshooting Guide (Resolved Issues)
The following errors occurred during setup and were resolved:
Cause 1: Docker network was configured as Internal: true. The container had no gateway to the outside.
Solution: Delete network and recreate without --internal flag.
Cause 2: net.ipv4.ip_forward = 0 on the host.
Solution: sysctl -w net.ipv4.ip_forward=1.
Cause 1: Firewall on Master blocked access. Mailcow rules overwrote standard rules.
Solution: iptables -I INPUT 1 ... (Insert at Position 1).
Cause 2: Incorrect Docker port binding.
Solution: Change ports to 3306:3306 (instead of binding to IP) to bypass Docker proxy issues.
Cause: The master container was recreated (force-recreate). This reset the binary logs. The slave looked for a log position that no longer existed.
Solution: Execute SHOW MASTER STATUS on master and enter new coordinates on slave via CHANGE MASTER TO ....
Disaster Recovery
If Server 2 fails:
- Switch DNS for services to Server 1.
- Remove write protection on Server 1:
STOP SLAVE;
SET GLOBAL read_only = 0;
Sei der Erste der einen Kommentar abgibt